Tuesday, 18 December 2012


Close Quarter Combat Simple Rules
“Using your Head...”

Author: Odhinn  Kohout


Sparring this week with some Officers/students I noticed that their autonomic response when grappling in close quarters was guys like to lead with their head, meaning they are looking at the floor when they rushed in on me or tried to tie me up with a collar tie.
This is very dangerous…and I thought I would point out a few things about it in relation to both improving your standup game and ground combatives.

GROUND-FIGHTING (Triangle choke)
If you are in top position and your Attacker manages to get you into a triangle with his legs you know (or you should…) that looking down at the floor will get you choked out for your mistake. You must look up as you push your hips in and up which will give you many transitional options for escaping this type of position.

FRONT GUILLITONE (CHOKE)
From a standing choke you grab the wrist which is wrapped around your head as your step in with your hips while at the same time looking up to the sky.

STANDING CLINCH
One of my students was reaching out for my neck with his head down. I promptly put him in a standing neck crank which he later commented was the worst pain he had ever experienced. I also told him I was being very nice as I could have face locked him while his head was down and thrown him onto the ground. There are a ton of very mean things that can be done from this position including “Stockades” commonly referred to as “ Nelsons” in which the 1/4, 1/2, 3/4 and "full nelson" are well known in various types of wrestling and are a mainstay to my own UZIEL© system.

REFLEXIVE RESPONSES (CENTRAL NERVOUS SYSTEM)
In studying criminal behavioral warning signs, a very familiar one is that just before a bad-guy decides to sucker punch you he MAY…lower his head and tuck in his chin. This goes for trained and untrained individuals. It is important for you as an Instructor to translate this knowledge to better understand why your students will do certain things in relation to defensive tactics.

PERIPHEAL VISION
It is very difficult to orient yourself if you are looking at the floor during an altercation to establish escape routes and your position in relation to your surroundings.

IN CLASS
When your students are practicing their clinch or other hands on standing arrest/control tactics they may lead with their head down as their body is protecting (unconsciously) their nose, eyes and chin from an attack/punch. There is no cognitive process in this response for most people, it is something that must be pointed out to them and explained.
If we reverse this… it can be used to the Officers advantage in teaching them very quick takedown techniques and positions of control as I discussed earlier in this blog. Criminals who try to grab and control and Officer in close quarters may commit this error and provide a route of escape or counter to the attack for an Officer who has been educated in head positions by their Instructor.

Train hard Gentlemen…

Sunday, 16 December 2012


Countering Takedown attempts (Single/Double Leg Take-downs)
Author: Odhinn Kohout


I do not like my students to use a sprawl technique on the job and as a result it is not taught in my courses. On the street it can leave you susceptible to multiple attackers and also keeps you at the center-line of your Attacker enabling him to “re-shoot” for another takedown on you repeatedly.In fact, MMA gyms will teach to re-shoot if your takedown has been stopped by a sprawl which leads to the obvious question for Military/Police CQC training “why do it then?”

It is crucial to get off the “12 o’clock” position or center-line if the bad-guy attempts to shoot in you for a take-down. This can be done by driving your forearms into his traps or controlling the top portion of his head at the “crown.” The top of the head provides the same physics as controlling a limb in that the farthest most region provides the best control.(For the arm this would be the blade edge/ridge part of the hand and for the head it would be the crown.)

Many defensive tactics systems will focus on the back of the neck for this control but in reality this will offer only a 50/50 chance of success in my opinion. From a failed takedown, attempting to control an aggressive attacker by the back of the neck is very difficult as it is a very strong region of the body. The top of the head can offer not only directional control but provides a takedown in driving the Attacker into the ground using both your hands to snap down the head as he shoots in for a gun disarm or leg takedown.

This will also place you in more of a “tripod” position than a sprawl which is advantageous to getting quickly back up to your feet by pushing back and up as opposed to trying to just stand up. (Experiment while wearing kit and you will immediately see the difference from a tripod position IE: shooting platform. Standing up is far more slow than pushing back and up with your hips)

I have seen many Instructors focus on counters to the takedown ONCE it has been applied. We teach our classes to avoid the takedown altogether as it is far more difficult to get out of a technique once it has been secured.

Using a sprawl ties up both your arms to your Attacker and don’t forget he may train with this in mind. But using your forearms from a startled autonomic flinch or a snap-down from the crown of his head will offset his vector of force/line of attack and give you more opportunities for use of force options and transitioning to create a reactionary gap. The bottom line … is that it keeps you on your feet where you should be.

Be safe gentlemen.

Tuesday, 11 December 2012


Locking the Face\ Arrest Control
Author: Odhinn  Kohout


I teach many versions of “FACE-LOCKS” in all my classes because Police and Military need techniques that are easy to learn and also litigation orientated as they are pain compliance based in nature.
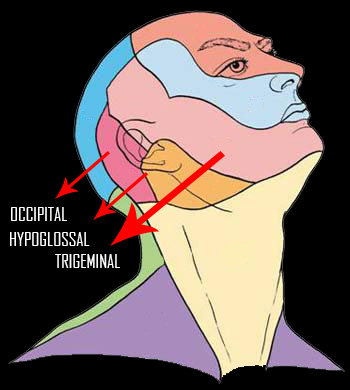
Most pressure point tactics do not work with a violent criminal who will not cooperate but applying the face-lock causes immediate pain. To apply the facelock you must leave no space whatsoever between your hands and the attacker’s face. The lock compresses the nerve an also controls the head which could help to prevent the bad-guy from suddenly reaching for a hidden weapon.

The hand position that I have found works very well is a modified “Gable Grip” in which the bones of the thumb specifically at the first knuckle are used for purposes of the pressure point. Placement will be just under the Malar bone (cheekbone) which offers both a landmark position as well as accessing the nerve which lies under the bone of the cheek. By using the clasped hands while in the Gable-Grip the knuckle will scoop under the malar bone as you keep the attackers face tight to your chest.

There are many variations of this position in which the radial bone of your forearm in place of the thumb can also be used to apply the face-lock successfully. It also does not need to be accurately placed in terms of the cheekbone due to the fact there are many nerves which are susceptible from this position as the illustration demonstrates.


This is a very effective cell or car extraction technique and can be applied if you are working in two man teams or as by yourself. When you are teaching your students takedowns to an arrest control position the face-lock can be a technique from the ground position that you can add to append to your arm and leg-lock curriculum.

Be safe Guys…

Saturday, 8 December 2012


CQC Lock Flow Drills

Author: Odhinn Kohout

One of the techniques which I use to reinforce our course material with our students and ensure a high level of comprehension are lock-flow drills.
Lock flow drills are simply put a combination of techniques put together into a sequence which your students can practice to order assist in memory retention.


Example:
I begin all my lock flow drills by placing them into some kind of context. (If you do not do this the student is merely learning a series of techniques as opposed to truly comprehending what they are learning. Think of this as short term vs. long term memory storage for cognitive reasoning.)
From a throw or take down you (as the Instructor) will demonstrate 3 (pick any number) tactics to control the Attackers far arm from side control. (The position is irrelevant as you can pick whatever position that you would like to work with your students during class time.)


Lock Flow sequence:
1.       Arm bent in top position (Americana, Kimura/Top wrist-lock)
2.       Arm straight (Armbar)
3.       Arm bent in bottom position (Chicken Wing, Reverse Figure-4, Double wrist lock)


Key Instructional Points:
Your demonstrations must be done slowly and provide technical explanations of how each lock works. Technical does not mean complicated…in fact it is just the opposite.
·         Does the lock need to placed above or below the elbow
·         How far or near does the arm need to be from the Attackers body
·         What nerves are affected by the lock
·         What counters are available to the Attacker
·         Is there a way for the Officer/student to perform the lock using only one hand instead of two in order to access his radio
·         How are the rotational axis of the joints affected by the lock ( this is crucial)


Final Point:
You students are intelligent and adapt quickly, by adding lock flow drills you will stimulate their learning and keep them interested in your curriculum.
Train hard and watch your partner’s back!

Monday, 3 December 2012


“Transitional Drills from H2H to Weapon Systems” (PART-1)
Author: Odhinn Kohout


The high ready position when should not exclusively be used for pistol or carbine terminology alone when teaching CQC material to your students. Conceptually the high ready position entails the elbows being close or tucked into the body to help maximize core strength and control. If you as the Instructor maintain some continuity in your defensive tactics program, you can assimilate this into your standup and ground-combatives programs as well unifying the totality of the training.
This makes it much easier as a reference point for your students if you refer to a high ready as the starting point regardless of the subject matter that you are covering for combatives. When teaching one of my students to fight from his back I will look at his arms to see their positioning. All I need to say to the Officer is “get into your high-ready” and he instinctively does so because…he carries a firearm and it is a familiar term. If this was a civilian class you would not be able to use this approach as they would lack the initial point of reference (high-ready)

From the clinch position in standup defense, the high ready correlates a correct physical response of the startled flinch with your hand positions (elbows tucked in) having access to other use of force options such as the baton, pepper spray  or Taser within the circular radius of the duty belt to the upper chest. For Military personnel the upper chest could include a fixed blade for easy access especially if you are knocked down in combat. If you consider that a great deal of Soldiers carry a knife but…in awkward places to draw under stress or the ground (leg, side, or back) you will see why I am stressing the importance of H2H positions in relation to weapon transitions as it will provide a way to always know where the tools are when you need them regardless of lighting conditions or in the worst case scenario if you are wounded and limb mobility is restricted.

Scenario:
You have been wounded or punched and knocked onto the ground. You Attacker jumps onto you to finish you off. How you have trained will now dictate your next actions…
If you are unarmed you bring your elbows in tight and your hands out towards the threat. From this base position you find yourself able to defend from a knife or flurry of punches. It will counter your body’s powerful autonomic response of “turtling” and turning away from the attack to protect the central nervous system.
In the scenario the Officer has comprehension through previous training that his weapons can be accessed from the belt to upper chest in a circular pattern. A pistol draw from this ground position will require an extra step of rolling the weapon side leg specifically the shin into the attacker to break the safeties of the holster easily and possible attain a supine shooting platform.
A soldier using this same scenario can access his fixed blade on the chest and flip it tip up into the Attacker. This will create a very solid obstacle which must be now navigated by the Attacker or he will find himself impaled on the blade by his own weight. 

These are some simple and basic applications which can be added to your current program and provide your students with a template to understanding and remembering their CQC program.
As always…train hard, train for combat.